Hi, in this post, I am going to address few issues that in general we will be facing while integrating the SilverLight Webpart in SharePoint Pages.
Error: "Could not download the Silverlight application or the Silverlight Plugin did not load."
Possible Corrections:
Make sure the following were done.
1) In inetmgr, go to the properties of the SiteCollection in which you wanted to add the Silver Light Webpart and in the HTTP Headers section, you will be having the MIME types button, clicking on which you have to mention about the Silver Light Version name in the properties window.
2)Make sure that the Silver Ligth DLL is placed in the GAC folder and also in the respective SiteCollection Bin folder.
3)Need to specify the SilverLight Safecontrol in both Central Admin Web.config file and also in the respective Site Collection web.config file.
Other Way to Achieve this:
Refer URL http://karinebosch.wordpress.com/2009/07/17/integrating-silverlight-3-in-sharepoint-2007/
alternatively go through the below steps as mentioned in the above URL:
Silverlight 3 has been released last week and it comes with really really great features. To learn more about them, I refer to posts like those of Tim Heuer, Scott Guthrie and Shawn Wildermuth. And a blog I personally like very much is the blog of Mike Snow. Besides those listed here, there are a lot of other interesting resources you can find on the net.
All these new features sounds very exciting. Today I have been trying to integrate Silverlight 3 into SharePoint and it has not been easy at all.
Installation of Silverlight 3
- Download Silverlight 3 runtime and install
- Download the Silverlight 3 SDK and install
- If you are a developer, download Silverlight 3 Tools for Visual Studio and install. If you run your environment in a Virtual PC (like most of the SharePoint developers do) you will encounter problems when you have no internet connection from within your Virtual PC. Until the beta version of Silverlight 3 you could use the trick to copy the content of the temporary folder while the exe was aching to install, and then install everything separately, but this time you will not find the Silverlight.3.x_Developer.exe file to enable Silverlight debugging in Visual Studio so you DO need an internet connection this time. (To enable internet access from within your VPC, I can recommend this post).
- If you need to develop more advanced user interfaces (and you will), you can download and install the Blend 3 trial.
If you installed all these bits, you are ready to go. Open Visual Studio 2008 and you can start developing your first Silverlight 3 applications. Exciting isn’t it? But if you are a SharePoint developer like me, there is the next hurdle to take: how can I display my first Silverlight 3 application in SharePoint? The SharePoint path has always been steep and has never been easy to take.
Configuration of the SharePoint server
Here comes the good news: in despite of previous versions, with Silverlight 3 you have to change NOTHING to the web.config of your SharePoint web application(s) on the server. You only have to configure the web.config for Framework 3.5 but this can easily lazily be done by Visual Studio 2008.
The last week I received a lot of questions on my blog: “Where is the System.Web.Silverlight.dll? I can’t find it.”. Well, I’m sorry, but it doesn’t exist anymore. You have to create the silverlight applications from within javascript, at least if you want to stay compatible.
Consequences for the SharePoint developer
You have two options:
- You are conservative and you install the Silverlight 3 SDK side by side with the Silverlight 2 SDK. In that case you can continue using the SilverlightControl, even with Silverlight 3 applications.
- You are progressive and you remove the Silverlight 2 SDK and install the Silverlight 3 SDK. In that case you have to change your code.
The conservative way
Install the Silverlight 3 SDK side by side with the Silverlight 2 SDK. In that case the System.Web.Silverlight.dll is still available and can be deployed in the Global Assembly Cache, and you can continue using the Silverlight control, residing in that System.Web.Silverlight.dll. The control works with Silverlight 2 and Silverlight 3 applications.
PS. I haven’t checked HttpWebRequest to call SharePoint web services, so I don’t know if that’s boobytrapped too.
The progressive way
Update 25/07/2009: because of encountering problems with execution of the script inside the web part code, I altered this post slightly.
This post explains how you can create a SharePoint web part that hosts a Silverlight 3 application. In a following post you will read how to host a Silverlight 3 application from within an application page. Both techniques are the basics that can be used in every SharePoint development scenario.
Create a javascript file with f.e. the name SpSilverlight.js. Include the following script to create a Silverlight application based on the silverlight.CreateObjectEx method:
function onSilverlightError(sender, args) {
var appSource = "";
if (sender != null && sender != 0) {
appSource = sender.getHost().Source;
}
var errorType = args.ErrorType;
var iErrorCode = args.ErrorCode;
if (errorType == "ImageError" || errorType == "MediaError") {
return;
}
var errMsg = "Unhandled Error in Silverlight Application " + appSource + "\n" ;
errMsg += "Code: "+ iErrorCode + " \n";
errMsg += "Category: " + errorType + " \n";
errMsg += "Message: " + args.ErrorMessage + " \n";
if (errorType == "ParserError") {
errMsg += "File: " + args.xamlFile + " \n";
errMsg += "Line: " + args.lineNumber + " \n";
errMsg += "Position: " + args.charPosition + " \n";
}
else if (errorType == "RuntimeError") {
if (args.lineNumber != 0) {
errMsg += "Line: " + args.lineNumber + " \n";
errMsg += "Position: " + args.charPosition + " \n";
}
errMsg += "MethodName: " + args.methodName + " \n";
}
throw new Error(errMsg);
}
function createSL(divid, swidth, sheight, source, initparameters)
{
var pluginid = divid + "Plugin";
var divElement = document.getElementById(divid);
var altHTML = divElement.innerHTML;
if (swidth == null)
swidth='100%';
if (sheight == null)
sheight='750px';
Silverlight.createObjectEx(
{
source: source,
parentElement: divElement,
id: pluginid,
properties:
{
// Plug-in properties
width:swidth,
height:sheight,
minRuntimeVersion:'2.0.31005.0'
},
events:
{
OnError: onSilverlightError // OnError property value -- event-handler function name.
// OnLoad property value -- event-handler function name.
},
initParams: initparameters
});
}You can also create a Silverlight object using the silverlight.CreateObject method and include that in the SpSilverlight.js file.
In your web parts in the OnPreRender event you will have to register following javascript files:
the Silverlight.js file (which comes with Silverlight and can be found in the C:\Program Files\Microsoft SDKs\Silverlight\v3.0\Tools directory)
the SpSilverlight.js file you just created.
protected override void OnPreRender(EventArgs e)
{
base.OnPreRender(e);
ClientScriptManager cs = Page.ClientScript;// Include the required javascript file.
if (!cs.IsClientScriptIncludeRegistered("sl_javascript"))
cs.RegisterClientScriptInclude(this.GetType(), "sl_javascript", "/_LAYOUTS/SL3/Silverlight.js");
if (!cs.IsClientScriptIncludeRegistered("spsl_javascript"))
cs.RegisterClientScriptInclude(this.GetType(), "spsl_javascript", "/_LAYOUTS/SL3/SpSilverlight.js");
}Notice the path to the javascript files. I both deployed them to a sub folder of the 12\TEMPLATE\LAYOUTS folder. To avoid having to deploy these files for each web part and application page, you can best deploy them once to a single sub folder of the 12\TEMPLATE\LAYOUTS folder. You can also deploy them to the ClientBin folder under your SharePoint web application (in IIS).
Call the above javascript from within the CreateChildControls method:
protected override void CreateChildControls()
{
string slstring = "";
silverlightHost = new LiteralControl(string.Format("{0}", slstring));
this.Controls.Add(silverlightHost);
}If you need to pass data to the Silverlight control you need to set the initParams argument. This is a comma delimited string which has the following syntax:
key1=value1,key2=value2,...Note that there are no spaces.
The CreateChildControls method would look as follows:
protected override void CreateChildControls()
{
string xaplocation = "/_LAYOUTS/SL3/HelloSilverlight3.xap";
string initparams = string.Format("url={0},list=Shared Documents", SPContext.Current.Web.Url);
string slstring = string.Format("", xaplocation, initparams);
silverlightHost = new LiteralControl(string.Format("{0}", slstring));
this.Controls.Add(silverlightHost);
}
Tuesday, May 4, 2010
Wednesday, March 17, 2010
Introduction to Microsoft InfoPath Designer 2010
Asif Rehmani has posted a demo about working with InfoPath Form Designer 2010 at the following link:
Rehmani's demo on Introduction to Microsoft InfoPath Designer 2010
The Following things are the key aspects of InfoPath Designer 2010 that are quite different from that of InfoPath 2007.
Lots and Lots of Changes in InfoPath Designer and Editor 2010, desperately waiting for SharePoint Server 2010, MS Office 2010 environment.
Rehmani's demo on Introduction to Microsoft InfoPath Designer 2010
The Following things are the key aspects of InfoPath Designer 2010 that are quite different from that of InfoPath 2007.
- The New MS Office 2010 has InfoPath Designer 2010 and InfoPath Editor 2010. InfoPath Designer is used to Design the forms and where as InfoPath Editor is used by the end users to fill out the forms.
- Now lets see InfoPath Designer. The Backstage has various templates, lets design the Blank InfoPath Form and you will be finding the ribbon in it. If you go through the tabs in the ribbon you will be coming across wide range of options available in desigining the InfoPath Forms.
- Now click on the Insert and click on the first Page layout, and then put the Section layout with in the page layout and then click on the Page Design and in this section you will be having wide range of options that can be applied to our form such as Colors etc.,
- You can Label the form with respective descriptions such as Name of the form, First name, Last name, Date, Department, Expense Amount and then add controls respectively by adding Textbox, Textbox, Date Picker control, Dropdown and Textbox from the 'Table Tools Layout' in the Home tab from ribbon.
- In the DataSource Pane you will be finding the respective Datasources ie., field1....field5. Change the DataSources names respectively to FirstName, LastName, Date, Department and ExpenseAmount. You can use the Background color and Border shading etc., fromt he Properties in the Control Tools.
- Apart from all these, InfoPath Designer 2010 provides controls called Date and Time Picker which is different from Date Picker and moreover this control is not available in InfoPath 2007, in which we can seperately have the Date and Time individually.
- Most of the properties and customizations in InfoPath Form Designer 2010 can be achieved directly from ribbon which is newly embeded in InfoPath Form Designer 2010.
Lots and Lots of Changes in InfoPath Designer and Editor 2010, desperately waiting for SharePoint Server 2010, MS Office 2010 environment.
Create and Manage SharePoint Content Using SharePoint Designer 2010
Asif Rehmani have given a demo about Creating SharePiont Content using SharePoint Designer 2010 at the following link:
Asif Rehmani's Demo on Creating SharePiont Content Using SharePoint Designer 2010
Thats it, in this way, you create the Content Types very easily using SharePoint Designer 2010.
If you don't want the site to be there and want to delete i, you can select the Site from the Navigation window and click on Delete from the ribbon but make sure that the deleted site will not be recovered from the recycle bin hence make sure before deleting the site.
Asif Rehmani's Demo on Creating SharePiont Content Using SharePoint Designer 2010
- Open SharePoint Designer 2010 -> Click on File Menu and select the top Site and in the Summary page, unser Subsites you will be finding New link, Click on that link to create a subsite to your top site by choosig the respective Site template and click OK to create the Subsite.
- Now in the new Site that is created, Select Lists and Libraries and then select SharePoint List and then Select Contacts from the ribbon and Create the Lists by giving a name 'Department Contacts'. In the newly created list, if we have to delete any column which is not useful, for eg., 'Company' column then you can you can do that in SharePoint Designer by selecting the newly created List and in the Summary page, you will be seeing a section called Customization, in which you will be finding 'Edit List Columns' and then select the column and click on Delete from the ribbon and save it. And the column will be deleted.
- And now go to Site Pages and click on Web Part Page and name it and click on it to go to that page. Now click on 'Edit File' link in 'Customization' section or Click on 'Edit File' in the ribbon and select 'Edit File in Normal Mode'. You will find only Content page editable which restricts you from breaking with the Master page. Now Click on 'Insert' from the ribbon, and then Data View and select the newly Created List initially in this list which will place a webpart in the newly created page using a webpart called Xslt List View webpart and then Save it.
Thats it, in this way, you create the Content Types very easily using SharePoint Designer 2010.
If you don't want the site to be there and want to delete i, you can select the Site from the Navigation window and click on Delete from the ribbon but make sure that the deleted site will not be recovered from the recycle bin hence make sure before deleting the site.
Glimpse about SharePoint Designer 2010 User Interface
There was a demo given by Asif Rehmani - Click the following link:
Asif Rehmani's Demo on the introduction to SharePoint Designer 2010
In this demo, he takes us through the SharePoint Designer 2010 Environment/ User Interface.
Asif Rehmani's Demo on the introduction to SharePoint Designer 2010
In this demo, he takes us through the SharePoint Designer 2010 Environment/ User Interface.
- Its a free application available along with Microsoft Office 2010.
- We need to understand that, SharePoint Designer 2010 is not compatible with SharePoint Designer 2007, it means that, the sites that were built SharePoint Server 2007 cannot be opened with SharePoint Designer 2010.
- SharePoint Designer 2010 has a ribbon just like any other MS Office applications like Word etc.,
- We can find a Navigation menu on the left hand side or else we can get the Navigation window from View menu. The ribbon changes depending on the selectin of the menu item in the Navigation window dynamically. for eg., if we are selecting Lists and Libraries in Navigation menu, the ribbon components will change where in it will have options like New Custom List, New SharePoint List, New External List, New Document Libraries etc.,
- There will be a summary page in the middle which has various things available depending on the selection made in the Navigation menu. for eg., Selecting a site shows you the options such as Site Information, Permissions, Customization, Subsites, Settings etc.,
Create External Content Types using SharePoint Designer 2010
There was a demo given by Asif Rehmani, Click the link below.
Asif Rehmani's Demo on Creating an External Content Type
The demo clearly explains about, how to create an External Content Type using SharePoint Designer for SharePoint Server 2010 sites.
The Key Concepts to understand in this demo are:
Have SharePoint Server 2010, SharePoint Designer 2010, then what are you waiting for, the demo gives you clear steps on how to create new External Content Types for SharePoint Server 2010 sites.
Hmmmm.... Desperately waiting for the SharePoint Server 2010 environment.
Asif Rehmani's Demo on Creating an External Content Type
The demo clearly explains about, how to create an External Content Type using SharePoint Designer for SharePoint Server 2010 sites.
The Key Concepts to understand in this demo are:
- There will be a ribbon available in both SharePoint Server 2010 and also in SharePoint Designer 2010.
- The demo shows about creating the external Content Types using SharePoint Designer 2010 and the creation of External Content type starts from Entities tab from New External Content Type
- In Central Administration of SharePoint 2010, Under Application Management, we will have an option called 'Business Data Catalogs' which will be renamed as 'Business Connectivity Services'
- The newly created External Content Type is available in this Business Connectivity Services under Manage Option.
- This newly created Content Types will be available under Site Actions -> Site Settings -> Custom Lists -> External Lists.
- While creating a new External list from newly created External Content type, we need to give the Name, Description along with Entity Type which is the new Data Connection that we have created in SharePoint Designer 2010 initially shown in the demo.
Have SharePoint Server 2010, SharePoint Designer 2010, then what are you waiting for, the demo gives you clear steps on how to create new External Content Types for SharePoint Server 2010 sites.
Hmmmm.... Desperately waiting for the SharePoint Server 2010 environment.
Friday, March 12, 2010
AJAX Webpart Integrating with SharePoint Site
Scenario: We need to get the data from SQL Server to a webpart based on the Filter conditions given by the End Users.
Pre-requisites: SharePoint Server 2007, Visual Studio 2008/2005, Must have access to SQL Server 2005 database.
Follow the below steps to create an AJAX Gridview webpart to be integrated with SharePoint Sites.
Step 1: First of all, Open Visual Studio 2008 -> New Project -> Visual C# -> SharePoint -> Webpart template. Give a name to your Project and then Click OK.

Step 2: Delete the default webpart1 that is created along with the project from Solution Explorer.

Step 3: Now right click on the Project in the Solution Explorer -> Add New Item -> Visual C# -> SharePoint -> Webpart. Give a name to your Webpart and then Click Add.

Step 4: We will be now adding some namespaces and their respective DLLs as follows.
NOTE: We require these namespaces and DLLs for the gridview and also to connect to the the Database to get the data and display it in the Gridview based on the query.
Name Spaces:
using System.Collections.Generic;
using System.Text;
using System.Web;
using System.Data;
using System.Data.SqlClient;
using System.ComponentModel;
using System.Drawing;
DLLs:
System.Data, System.Data.SqlClient, System.Drawing and System.Web.Extensions (V1.0.6x)
NOTE: Kindly make sure that the version of System.Web.Extensions must be V1.0.6x as we will be having 2 System.Web.Extensions DLLs
Step 5: In order to get the desired webpart properties in which we have a StringConnection, SQL Query, and a Filter Name, in order to achieve this, we need to implement the following code.

a) Add an object for a Grid View Control.
GridView gv = new GridView();
b) //Deifining Controls that are to be used in our Webpart
GridView gv = new GridView();
private GridView gv;
private TextBox txtBox;
private Button btnSearch;
private Label lblMsg;
private Label lblFilterName;
private UpdatePanel updtPanel;
private UpdateProgress updtProgress;
private static readonly object EventSubmitKey = new object();
c)//Adding a variable StringConnection, Connection String, SQL Query and Filter Name
public string strConnection;
[Personalizable(), WebBrowsable(true), WebDisplayName("String Connection"), Category("Data Properties")]
public string SQLQuery;
[Personalizable(), WebBrowsable(true), WebDisplayName("SQL Query"), Category("Data Properties")]
public string filterName;
[Personalizable(), WebBrowsable(true), WebDisplayName("Filter Name"), Category("Data Properties")]
Thursday, March 4, 2010
SharePoint: Forms Based Authentication
In this post, I am going to detail about implementing Forms Based Authentication in SharePoint Server for a Web application.
Scenario: If you have t0 have only Non Domain users to access a specific site and those user credentials will be different from Domain credentials and more over those users have to be created by using ASP.NET Configuration wizard then Forms Based Authentication is the best solution for this scenario.
The following simple steps allow you to create the Forms Based Authentication.
Step 1: Browse to Central Administration -> Application Management -> create or extend Web application -> Create a new Web application. And then create the Site Collection for this site and make sure that you do not open/browse the site yet.


Step 2: Now open the SQL Server Management Studio, and create a new database in SQL Server, by right clicking the Databases and select Create a New Database and then give the name to the database and click on Create - Your new database will be created.


Step 3: Go to Visual Studio 2005 Command prompt and run aspnet_regsql and in the UI, select the newly created database in step 2 and complete the aspnet_regsql wizard.


Step 4: Now open Visual Studio 2005 and create a new Project by selecting ASP.NET Web application template. In the web.config file that is created along with the Project, add the Connection string just above the System.web tag, as below:


Step 5: Now in the Solution Explorer you will be having the aspnet Configuration Icon, click on that icon which takes you to Website Administration Tool in which you need to go to Security Tab and select Authentication type and then select Internet option and then click on Security Tab in which you will be finding the Create Users option. Click on the Create Users option and then create a sample user eg., test.


Step 6: Now go to Central Administration -> Application Management ->Authentication Providers and then change the Authentication type to 'Form' and membership provider name to 'AspNetSqlMembershipProvider'.

Step 7: Add the same connection string just above the system.web tag in Step 4 in both Central Administration Web application's web.config file and also in the SharePoint Web application created in Step 1's web.config file.
Step 8: Now change the SharePoint Web Application's Site Collection Administrator to 'test' created in Step 5. This can be achieved by going to Central Administration -> Application Management tab -> Site Collection Administrators.

Step 9: Close the Central Administration Site.
Step 10: Now open the SharePoint Web Application Site created in Step 1 and you will be finding the login screen in which you have to provide the newly created 'test' user credentials in Step 5.


Monday, February 15, 2010
InfoPath Forms Vs ASPX Pages
In order to create forms for the use of SharePoint Sites, we will be generally using either InfoPath forms or ASPX pages.
In this blog, I am going to mention the pros, cons and the decisions that has to be made at the time of development for the forms for the use in SharePoint sites.
In general, the decision to use among InfoPath forms and ASPX pages all depends on the requirement of the form. Most of the Developers or Managers will think of InfoPath forms for developing the forms to use them in SharePoint Sites as it will be easy to develop and there will be no much coding involved.
Before going for such a decision, we need to understand the requirement and also the pros and cons of using InfoPath forms. Based on the requirements complexity, we need to choose either of InfoPath forms or ASPX pages. Because as the complexity increases, ASPX pages will be the best option for creating the forms. As InfoPath forms by itself are incomplete and needs to have a container (like XMLFormViewer webpart) to be placed in the SharePoint Sites for having same look and feel, which is again in an ASPX page, we need to carefully analyze the requirement and take decisions accordingly.
The following are the PROS and CONS (for and against) using InfoPath over ASPX pages which has to be considered before making a decision.
PROS:
CONS:
In this blog, I am going to mention the pros, cons and the decisions that has to be made at the time of development for the forms for the use in SharePoint sites.
In general, the decision to use among InfoPath forms and ASPX pages all depends on the requirement of the form. Most of the Developers or Managers will think of InfoPath forms for developing the forms to use them in SharePoint Sites as it will be easy to develop and there will be no much coding involved.
Before going for such a decision, we need to understand the requirement and also the pros and cons of using InfoPath forms. Based on the requirements complexity, we need to choose either of InfoPath forms or ASPX pages. Because as the complexity increases, ASPX pages will be the best option for creating the forms. As InfoPath forms by itself are incomplete and needs to have a container (like XMLFormViewer webpart) to be placed in the SharePoint Sites for having same look and feel, which is again in an ASPX page, we need to carefully analyze the requirement and take decisions accordingly.
The following are the PROS and CONS (for and against) using InfoPath over ASPX pages which has to be considered before making a decision.
PROS:
- If the requirement is all about showing the data in the form from SharePoint Site, or external data store, InfoPath form is recommended as it does not require much coding.
- If we need to submit the data in the form to multiple locations such as SharePoint library, external data store, InfoPath forms are the best solution.
- Moreover if there is a need to developing numerous forms which are simple enough and well documented, then InfoPath forms should be considered, as they deliver the solution in a short span as it has drag drop features in it and also provides support for prebuilt template parts and shared data connections.
- InfoPath forms are more flexible to use for a quick and neat solution as it has some complex out of the box controls, like Date Picker, File Attachment control, Repeating Sections and also have the code-behind if needed to manipulate the data on the form or behind the form and it also includes a Design Checker to help consistency for forms.
- InfoPath forms supports data integrity and version control for document management purposes and add structure to information gathering by converting legacy documents to rich InfoPath form templates and are also very nicely integrated with SharePoint custom workflows as workflow association tool.
- It is fully integrated in Microsoft Office 2007 suites like Outlook e-mail messages that can be deployed as Outlook e-mail messages, so collegues can complete the forms without leaving the familiar Outlook environment.
- InfoPath forms can easily convert word documents and Excel spreadsheets to forms and build templates to work with.It also creates PDF or XPS and other important document formats and is extensible by addition of a free pulg-in to install third party tools and components for document, archival and records management.
- Support for information rights management to help manage permission control and building a powerful document management team site and is also fully centralized for entire Organization and enables Organizations to Centrally.
- InfoPath forms are firewall friendly, and the InfoPath Forms Services make it easy to extend the forms solutions beyond the firewall because of using many different web browsers and mobile devices.
- InfoPath forms are based on XML and the form is rendered using XSLT stylesheet and the data submitted through the form is available in XML format and hence the data is well structured to retrieve later on and dump the data/forms in some external system. This is in combination with BizTalk Server is a perfect architecture for document transition through multiple levels.
CONS:
- If it is a single form and needs complex actions, to and fro between the form and the data store, then choosing Custom ASPX pages is recommended.
- A web browser-enabled InfoPath form does not support all features of InfoPath client.
- If the requirement needs feature like user going through multiple screens, then Custom ASPX is the solution.
- Apart from few complex controls, InfoPath browser enabled forms does not support many advanced controls such as Combo Box, Master/Detail view control, etc., Depending on these limitations, we have to decide on InfoPath forms or ASPX pages. Where ASPX pages have no such limitations.
- ASPX can have and do everything that an InfoPath form does with an exception of additional development effort. Apart from it, the deployment process of ASPX forms is much better and easier than InfoPath Forms.
- InfoPath Forms are inflexible-difficult or impossible to customize unless you can hack the xsl files of InfoPath.
- InfoPath forms will not support SharePoint web services data connections in Forms Based Authentication, image buttons, html, and tree control and is difficult to support Forms Based Authentication(FBA).
- Moreover it does not support username() function in FBA as it cannot recognize the current user.
- It is difficult to perform automated web test against Forms Services and difficult to support automated deployment as you have to unzip the xsn file and programatically modify the manifest.xsf file, and zip back to the xsn file for automated publishing.
- The way that Forms Services supports deployment of InfoPath forms is meaningless as it creates SharePoint Solution Packages with GUID and creates features with meaningless names on the SharePoint Features folder.
Monday, February 8, 2010
Visual Studio 2008 Workflows for SharePoint 2007 Document Libraries
Scenario: There is a SharePoint Document library to which, we are going to associate a custom Workflow which will be developed in Visual Studio 2008. This Workflow will update the status of the Document depending on the percentage edited for a particular document in the Document Library.
Pre-requisites: Microsoft Office SharePoint Server 2007, MS Office 2007, Visual Studio 2008.
Follow the below steps to achieve the Custom workflow which will satisfy the above sceanrio.
Step 1: First Create a Document Library in your SharePoint Site. I have named it as VS2008WFDocLibrary.

Pre-requisites: Microsoft Office SharePoint Server 2007, MS Office 2007, Visual Studio 2008.
Follow the below steps to achieve the Custom workflow which will satisfy the above sceanrio.
Step 1: First Create a Document Library in your SharePoint Site. I have named it as VS2008WFDocLibrary.

Step 2: Create 3 columns with the below mentioned information:
Once you are done creating the Columns, your column settings page will look as follows in columns category:
 Step 3: Now from the Document Library page, click New Document.
 If you encounter a Fully Trust error msg as follows Click OK.
 When the document is opened, save the document in the same Document library by giving a name.
Do not close the document, instead do the following things in the document. The opened document will look like:
Inside the document, type as follows :
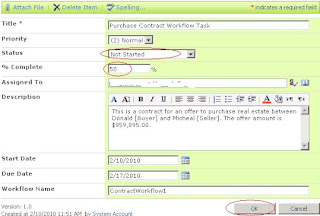
Sample Contract Buyer: Seller: Purchase:
Now from the menu, Select Insert tab->Quick Parts->Document Property->then select respective property for respective field such that the final document will appear as follows: Fill the details in the property fields or in the textboxes provided at the top of the document and then save the document.
Step 4: Start Visual Studio 2008 and Create a New Project by selecting the SharePoint 2007 Sequential Workflow template and give a name to this project. I have given the name as "ContractWorkflow". And then follow the below mentioned steps:


Once you have created the Workflow, Visual Studio 2008 opens the Designer window showing the below fig., Workflow1.cs in design view.
Step 5: If you don't see this, double click the Workflow1.cs file from the Solution Explorer. Now that you see this, drag and drop the Create Task activity which is in SharePoint Workflow tab from the Tool Box. If you don't find this, select the Tool Box from the View Menu. Step 6: Now configure the properities for CreateTask1 activity as below. To get into the Properites window of CreateTask1, right click on the CreateTask1 and select Properties.
 In order to set the properties of the CreateTask1, Click on the respective texboxes for the desired properties.
TaskID property:
TaskProperties property:
MethodInvoking handler: For this you need to type the name in the Textbox provided. I have given the name as myTaskCreation and press enter. This will redirect to Code View of the Workflow1.cs
In this code window, write the following code in the MyTaskCreation event handler and also add the CustomFieldText function. Now, go back to the Design view of the Workflow1.cs and go to the properties of the CreateTask1 and then give the name to the Correlation Token. I have given the name as "myTaskToken"
 Now expand the Correlation Token property to display the OwnerActivityName subproperty and select the value "Workflow1" from the dropdown.
Step 7: Now add the While Activity which will be there in Windows Workflow V3.0 tab to the Workflow from the Tool box and place it as shown below. Its name will be by default whileActivity1.
Now locate the Condition property for whileActivity1 and select the Code Condition as the value. Now that, expand the Condition property to display the subproperty, type myTaskNotCompleted and press the Enter key. The code window Workflow1.cs opens and in the myTaskNotCompleted event handler, write the following code:
If you look into the code, taskCompleted variable was not declared and so declare the variable in the main class.
private bool taskCompleted = false;
Step 8: Now go back to the Design View and drag onTaskChanged activity which is in SharePoint Workflow tab from the Tool Box and drop it inside the While Activity as shown below. This activity will be named as onTaskChanged1 by default. Now configure the properities for onTaskChanged1 activity as below. To get into the Properites window of onTaskChanged1, right click on the onTaskChanged1 and select Properties.
Correlation Token property: Set the property to myTaskToken
AfterProperties property: Set the property to afterMyTaskPropertyChange and ensure that the Create Property radio button is selected in the Bind to new member tab. TaskId property: Set the property to myTaskId in the existing member tab.
 Step 9: Now double click on the onTaskChanged1 activity in the design window, the code window opens with the onTaskChanged1 event handler.
write the following line of code in this event handler.
if (afterMyTaskPropertyChange.PercentComplete == 1.0)
{
taskCompleted = true;
}
And thats it, you are now done with the code part. Set a couple of break points for the event handlers ie., for myTaskCreation and onTaskChanged1 event handlers in the code for debugging the process.
Step 10: Press F5 to start the Debug process.
In this process you may find a warning window about script debugging disabled message, Click Yes. It will then be redirected to your SharePoint Document Library that you have created initially. You will be seeing a document lying inside the Document Library. Click on the Context menu of that Item as shown below and select Workflows.

Step 11: You will be redirected to Workflow Settings of the Document Library in which you will be seeing the default workflows and also the workflow that we have created. So Click on the workflow that we have created. In my case it is ContractWorkflow1

Step 12: Now that as the workflow triggers, you will hit the first break point and stops in Visual studio, press F5 to continue. You will be again redirected to the Doucment Library inwhich you will be now seeing a new column "ContractWorkflow1" where it says "Inprogress". Now Click on the Inprogress link to see the status of the workflow.


Click the edit item to edit the task.
Change the status of the percentage to 50% and click OK. You will be again redirected to Visual studio because you have edited the task and the workflow that we created will trigger when the task is edited or manually triggered and hence we will be redirected to Visual Studio again.

Step 14: Press F10 to debug the code step by step and you will find that the percentage condition 1.0 was not met and now press F5 to continue. You will be again redirected to the SharePoint Document Library. Now repeat Step 13 and this time change the percentage to 100% and click OK. You will be redirected to Visual Studio and now press F10 to debug the code line by line and now that you can see that the percentage condition was met and so it will complete the task and will be redirected to SharePoint Document Library and will show the Workflow status as completed.

Thats it, you have now successfully created the custom Workflow using Visual Studio 2008.
Have fun, write more custom workflows. Will catch you soon with another blog.
Subscribe to:
Posts (Atom)