Pre-requisites: Microsoft Office SharePoint Server 2007, MS Office 2007, Visual Studio 2008.
Follow the below steps to achieve the Custom workflow which will satisfy the above sceanrio.
Step 1: First Create a Document Library in your SharePoint Site. I have named it as VS2008WFDocLibrary.

Step 2: Create 3 columns with the below mentioned information:
Once you are done creating the Columns, your column settings page will look as follows in columns category:
 Step 3: Now from the Document Library page, click New Document.
 If you encounter a Fully Trust error msg as follows Click OK.
 When the document is opened, save the document in the same Document library by giving a name.
Do not close the document, instead do the following things in the document. The opened document will look like:
Inside the document, type as follows :
Sample Contract Buyer: Seller: Purchase:
Now from the menu, Select Insert tab->Quick Parts->Document Property->then select respective property for respective field such that the final document will appear as follows: Fill the details in the property fields or in the textboxes provided at the top of the document and then save the document.
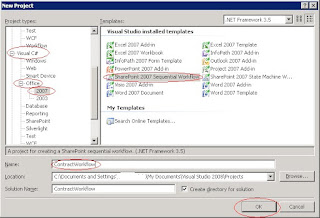
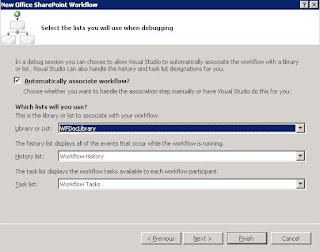
Step 4: Start Visual Studio 2008 and Create a New Project by selecting the SharePoint 2007 Sequential Workflow template and give a name to this project. I have given the name as "ContractWorkflow". And then follow the below mentioned steps:


Once you have created the Workflow, Visual Studio 2008 opens the Designer window showing the below fig., Workflow1.cs in design view.
Step 5: If you don't see this, double click the Workflow1.cs file from the Solution Explorer. Now that you see this, drag and drop the Create Task activity which is in SharePoint Workflow tab from the Tool Box. If you don't find this, select the Tool Box from the View Menu. Step 6: Now configure the properities for CreateTask1 activity as below. To get into the Properites window of CreateTask1, right click on the CreateTask1 and select Properties.
 In order to set the properties of the CreateTask1, Click on the respective texboxes for the desired properties.
TaskID property:
TaskProperties property:
MethodInvoking handler: For this you need to type the name in the Textbox provided. I have given the name as myTaskCreation and press enter. This will redirect to Code View of the Workflow1.cs
In this code window, write the following code in the MyTaskCreation event handler and also add the CustomFieldText function. Now, go back to the Design view of the Workflow1.cs and go to the properties of the CreateTask1 and then give the name to the Correlation Token. I have given the name as "myTaskToken"
 Now expand the Correlation Token property to display the OwnerActivityName subproperty and select the value "Workflow1" from the dropdown.
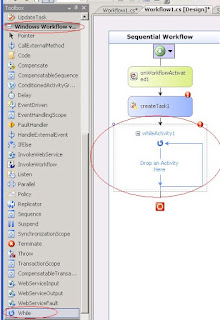
Step 7: Now add the While Activity which will be there in Windows Workflow V3.0 tab to the Workflow from the Tool box and place it as shown below. Its name will be by default whileActivity1.
Now locate the Condition property for whileActivity1 and select the Code Condition as the value. Now that, expand the Condition property to display the subproperty, type myTaskNotCompleted and press the Enter key. The code window Workflow1.cs opens and in the myTaskNotCompleted event handler, write the following code:
If you look into the code, taskCompleted variable was not declared and so declare the variable in the main class.
private bool taskCompleted = false;
Step 8: Now go back to the Design View and drag onTaskChanged activity which is in SharePoint Workflow tab from the Tool Box and drop it inside the While Activity as shown below. This activity will be named as onTaskChanged1 by default. Now configure the properities for onTaskChanged1 activity as below. To get into the Properites window of onTaskChanged1, right click on the onTaskChanged1 and select Properties.
Correlation Token property: Set the property to myTaskToken
AfterProperties property: Set the property to afterMyTaskPropertyChange and ensure that the Create Property radio button is selected in the Bind to new member tab. TaskId property: Set the property to myTaskId in the existing member tab.
 Step 9: Now double click on the onTaskChanged1 activity in the design window, the code window opens with the onTaskChanged1 event handler.
write the following line of code in this event handler.
if (afterMyTaskPropertyChange.PercentComplete == 1.0)
{
taskCompleted = true;
}
And thats it, you are now done with the code part. Set a couple of break points for the event handlers ie., for myTaskCreation and onTaskChanged1 event handlers in the code for debugging the process.
Step 10: Press F5 to start the Debug process.
In this process you may find a warning window about script debugging disabled message, Click Yes. It will then be redirected to your SharePoint Document Library that you have created initially. You will be seeing a document lying inside the Document Library. Click on the Context menu of that Item as shown below and select Workflows.
Step 11: You will be redirected to Workflow Settings of the Document Library in which you will be seeing the default workflows and also the workflow that we have created. So Click on the workflow that we have created. In my case it is ContractWorkflow1
Step 12: Now that as the workflow triggers, you will hit the first break point and stops in Visual studio, press F5 to continue. You will be again redirected to the Doucment Library inwhich you will be now seeing a new column "ContractWorkflow1" where it says "Inprogress". Now Click on the Inprogress link to see the status of the workflow.
Step 13: Now click on the Purchase Contract Workflow Task link to display the task. Now observe carefully and you will note that the Description property of the task contains the data that you entered into the Word document for the buyer, seller and purchase price.
Click the edit item to edit the task.
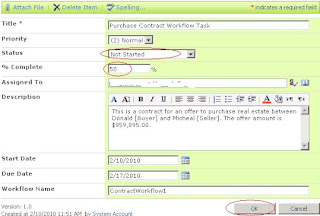
Change the status of the percentage to 50% and click OK. You will be again redirected to Visual studio because you have edited the task and the workflow that we created will trigger when the task is edited or manually triggered and hence we will be redirected to Visual Studio again.

Step 14: Press F10 to debug the code step by step and you will find that the percentage condition 1.0 was not met and now press F5 to continue. You will be again redirected to the SharePoint Document Library. Now repeat Step 13 and this time change the percentage to 100% and click OK. You will be redirected to Visual Studio and now press F10 to debug the code line by line and now that you can see that the percentage condition was met and so it will complete the task and will be redirected to SharePoint Document Library and will show the Workflow status as completed.
Thats it, you have now successfully created the custom Workflow using Visual Studio 2008.
Have fun, write more custom workflows. Will catch you soon with another blog.


No comments:
Post a Comment
Please Leave Your Comments Here On This Post.....