For Deploying Windows SharePoint Server (WSS) components, Microsoft prefers doing it by using SharePoint Solution Package files. ".wsp" is single compressed Solution Package file that consists of one or more WSS components such as Assemblies, Features, Web parts, Web pages, Templates etc.,
Why Solution Packages?
In order deploy your SharePoint application to a web farm with multiple servers should not be done by simply copying files, instead, deploying solution files.You can avoid errors that might occur if you were to attempt to uninstall the solution manually.And also altering the Code in the web.config manually and deploy custom dynamic linked libraries to the GAC and to each and every bin folder on multiple servers has to be done which is a cumbersome process, missing one simple thing may result in failing the deployment of your application among the multiple servers in your web farm.
Hence deploying solution packages is both easier and more robust than copying files manually.
Enough of theory now, lets see what are all the steps involved in Creating and Deploying the Solution Files with an example:I will categorize the process in three divisions as follows:
- Creating a Solution File
- Adding a Solution File
- Deploying a Solution File
CREATING A SOLUTION FILE
Step 1: We will be creating the Solution Package throug Visual Studio 2008. Hence Open Visual Studio 2008.
Create a new Project and in C#, Select ASP.NET Web Application template and give a name and select the path where you want to save the Project and click OK. In my case I have given the name as "SharePointSolutionPackage".
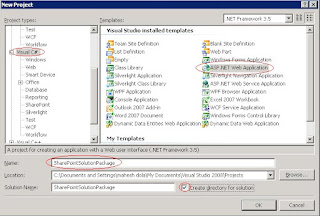
Step 2: Replicating the Features folder Structure similar to 12 hive folder.
Now we need to create a folder structure for our project in order to meet the deployment successfully done in the 12 hive -> FEATURES folder structure.
Create a Folder by name Source under the Solution folder: Rightclick on the main project in the Solution Explorer and then Add -> New folder and name it as "Source".
Inside the Source Folder, create a subfolder by name "SharePointList" folder, Create two more folders by names "ListTemplates" and "Messages" inside SharePointList folder. You'll use those folders later to hold the manifest and schema files for the application.
Now create 3 XML files with name manifest.xml, feature.xml and SharePointListManifest.xml where, except SharePointListManifest.xml, rest of the xml file names must be the same.
Reason for Folder Strucutre: Any feature to be deployed in the 12 hive structure must follow this folder structure and naming conventions in order for SharePoint to understand the feature.
If you browse the following location "C:\Program Files\Common Files\Microsoft Shared\web server extensions\12\TEMPLATE\FEATURES\", where C drive is the location of SharePoint Server installation, in which if you explore any of the list folders, you will see the structure similar to the one that we have created.
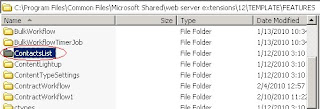
Step 3: Creating Feature, SharePointListManifest and schema files .
Creating feature.xml: We will now create a feature.xml file based on the SharePoint Contact list. To do this, Opend the feature.xml file that we have created from the Solution Explorer. This file holds the references of two other files SharePointListManifest.xml and schema.xml. The content in the feature.xml file should be as follows:
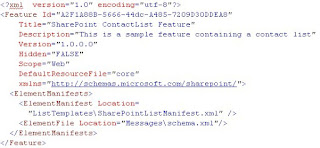
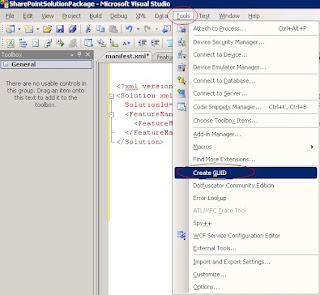
Note: In the code, you can see, Feature tag which has an ID, which is a GUID, this GUID has to be generated from the tools menu by selecting "Create GUID" in Visual Studio 2008. Click on New GUID and then click on Copy GUID. Now you have to paste the copied GUID in the place of Feature Id in the code.
Creating SharePointListManifest.xml file: The Code is as follows:
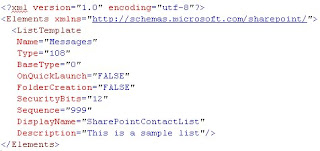
Creating schema.xml file:
To Create the schema.xml file, copy the file from the following location: "C:\Program Files\Microsoft Shared\web server extension\12\TEMPLATE\FEATURES\ContactsList\Contacts" and paste it in the Messages folder that you have created in step 2, ie., replace the schema.xml file with this file.
Finally your files has to be in this order: feature.xml in SharePiontList folder, SharePointListManifest.xml in ListTemplates folder and the schema file in Messages folder respectively.
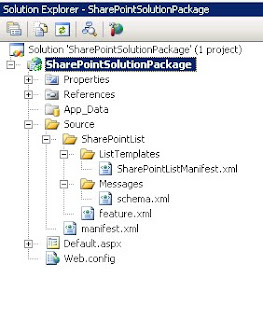
Step 4: Creating Manifest and Data Definition files.
Creating Manifest.xml: We now need to create a manifest.xml file in the Source folder. The manifest.xml file should refer feature.xml file in which it referes to SharePointListManifest.xml and schema.xml files. The code in the manifest.xml is as follows

Note: In the code, you can see, Solution Id tag which has an ID, which is a GUID, this GUID has to be generated from the tools menu by selecting "Create GUID" in Visual Studio 2008. Click on New GUID and then click on Copy GUID. Now you have to paste the copied GUID in the place of Solution Id in the code.
Creating a Data Definition File:
Now its the time to create a Data Definition File (.ddf). This file contains the instructions required later by the makecab.exe utitility which will be deploying the feature to SharePoint site and is needed to create the cabinet (CAB) file. Here's the content:
 Now as we are done with all XML files, folders and files in their respective folder structure, and also the Data definition file, we are now ready to generate the output CAB file in the Bin directory.
Step 5: Generating the .ddf file.
Inorder to generate the wsp file, we need to run the command in the command prompt. Run the command prompt and browse to your project location and then run the command as follows:
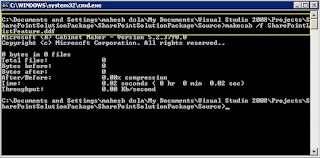
ADDING A SOLUTION FILE
Now we need to add the solution. For this we need to use stsadm command. Before using the command, we should make sure that the .wsp file that has been generated in the bin folder should be placed in the following folder:
C:\Program Files\Common Files\Microsoft Shared\web server\extensions\12\BIN.
Then in the command prompt, browse to C:\Program Files\Common Files\Microsoft Shared\web server extensions\12\BIN and then run the following command. In my case it is as follows:
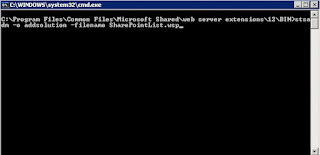
Thats it, you are done creating the Solution Package. We now need to Deploy the Solution.
DEPLOYING A SOLUTION FILE
To deploy the solution, we need to use the stsadm command in the same command prompt location as it is for adding the solution. In my case, it is as follows:
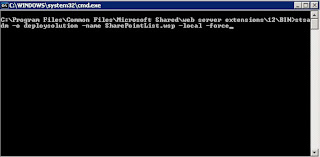
You have now created and deployed the solution SharePointList.wsp to WSS.
To verify that the solution file has been successfully deployed, you go to Central Administration > Operations -> Solution Management and in that list you can see your solution status as deployed.
You can even check the same by going to Central Administration ->Site Settings -> Site Features option and in the list of items, you can see your Solution file.
We now need to activate the solution, by clicking activate just beside the solution item in the Central Administration -> Site Settings -> Site Features. Alternatively, you can use the stsadm command as follows:
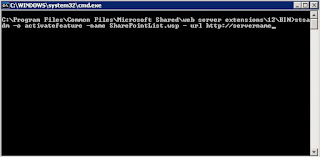
Thats it, you are done with deploying the solution file. You will now be seeing this SharePointList feature in Site Settings -> Modify All Site Settings page.
Think smart, and work easy. Will catch you in my next blog sooner.
No comments:
Post a Comment
Please Leave Your Comments Here On This Post.....