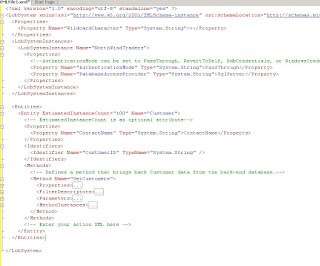
- Create a Application Definition File.
- Configure from Shared Service Provider from Central Administration Site.
This Application Definition File usually consists of information about the LOB (Line of Business Data) such as:
- Location of LOB Data
- How to Access(credentials) LOB Data
- Entities to be extracted and the required parameters to be passed to extract the data if necessary
- the associations among the entities etc.,

But hang-on, don't worry looking at the code, you don't need to worry about it. Instead you can download BDC Meta Man tool which is available online both trial version and you can also purchase based on the requirement.
http://www.lightningtools.com/downloads/bdcmetaman-download.aspx
Once you download the zip file, right click the zip folder properties and click Unblock option and then run the setup file from the zipped folder.
Once the tool is installed, run the wizard and you will see a screen similar to the following:
Follow these steps to create the Application Definition File which has to be imported in Shared Service Provider.
Step 1: Click on "Connect to DataSource" context menu (down arrow) and select respective Database. Here I am select SQL Server as I am going to importing data residing in SQL Server.
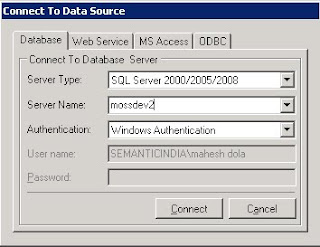
Step 2: Now fill the respective details in the Connect to Datasource Wizard as shown below with your respective DB Server details and then Click on "Connect".
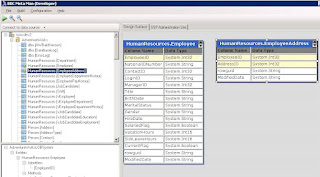
Step 3: Now the wizard will display the selected Database and respective tables from the Database that you have connected to. Now Drag and drop tables on the designer on right hand side from the tree view.
Step 4: Now make any changes such as foreign key association, by connecting between two tables with the column names such as EmployeeID.
Step 5: Now Click on Configuration -> Settings and select the path from browse where you want to save the Application Definition File and click Save.
Step 6: Now Click on Play button to run and generate the Application Definition File. The XML file will be generated at the speicified location which has to be used in the Shared Service Provider for BDC.
Now that you have generated the Application Definition File, you have to go back to Shared Service Provider site, ie., SSP site and in the home menu click on "Import Application Definition" option under "Business Data Catalog" category
Browse the Application Definition File in this wizard and then select the options as per requirements and then click on "Import".
Importing of the Application Definition File will take some time and will be done successfully.
You will be redirected to View Entities of BDC page. You can assign respective permissions for the Entities.
Now that you are done configuring BDC. Lets create a new a page and see how to actually use this BDCs in the webparts.
Now lets see an example of connecting between two BDC webparts where in the selected item in the List will be displayed in the BDC Item webpart. Follow the below steps.
Step 2: Once you have added the webparts, edit Business Data List webpart and select Connections and then select selected Item to and finally select the "vEmployee table" as shown below.
Thats it you are done connecting 2 webparts.
Will come up with another blog sooner. Have a nice day.


No comments:
Post a Comment
Please Leave Your Comments Here On This Post.....