Pre-requisites: InfoPath 2007, Microsoft Office SharePoint Server 2007, Visual Studio Tools for Applications.
In this post, I am going to detail about how to submit the data from an InfoPath form to a SharePoint List.
In order to detail this, I am taking an example of a feedback form, where in the end users will fill the form and submit, and upon submitting the form, the details entered in the form will be submitted to a SharePoint List.
Step 1: First of Create a Custom List in a SharePoint Site. I have named it as Feedback. Now create some columns as per your feedback form. I have created Username, Subject, Description, and EmailID as columns in which all the columns are of type Single text.
Step 2: Now open InfoPath Form 2007, and follow the below steps which has to be done in InfoPath Form.
DataConnection for Submitting the Data: In the men, Click on Tools -> DataConnections and then Click Add in the Data Connection Wizard.
Now it is the time for us to talk about the Submit Button in the form. If you double click the form, it will open up the properties window, in which you have to click on edit form code.

This will redirect to VSTA editor. if it is showing an error such as the following:

It means that you haven't installed the VSTA. You have to install VSTA in order to perform coding in InfoPath forms. For directions to installing VSTA, Click here...
Once it is redirected to VSTA editor, the code inside will look like the following..
Write the following code in Button Click Event "CTRL1_5_Clicked"
try
{
XPathNavigator root = MainDataSource.CreateNavigator();
// Retrieve the values for the separation list item
string listID = root.SelectSingleNode("/my:myFields/my:listID", NamespaceManager).Value;
string nameDS = root.SelectSingleNode("/my:myFields/my:nameDS", NamespaceManager).Value;
string subjectDS = root.SelectSingleNode("/my:myFields/my:subjectDS", NamespaceManager).Value;
string descriptionDS = root.SelectSingleNode("/my:myFields/my:descriptionDS", NamespaceManager).Value;
string emailDS = root.SelectSingleNode("/my:myFields/my:emailDS", NamespaceManager).Value;
if (listID == null || listID == "" || nameDS == "" || subjectDS == "" || descriptionDS == null || emailDS == null)
{ }
else
{
//This is CAML xml file. it contains batch and method nodes
XPathNavigator batch = DataSources["feedback"].CreateNavigator();
batch.SelectSingleNode("/Batch/Method/Field[@Name='Title']", NamespaceManager).SetValue(nameDS);
batch.SelectSingleNode("/Batch/Method/Field[@Name='Subject']", NamespaceManager).SetValue(subjectDS);
batch.SelectSingleNode("/Batch/Method/Field[@Name='Description']", NamespaceManager).SetValue(descriptionDS);
batch.SelectSingleNode("/Batch/Method/Field[@Name='EmailID']", NamespaceManager).SetValue(emailDS);
DataConnections["Web Service Submit"].Execute();
}
}
catch (Exception ex)
{
ex.Message.ToString();
}
Now that you are done with coding. You now need to preview the form, by clicking preview, and you will see the form, fill the details and click on submit. The details will be submitted in the SharePoint list.
Once this testing is done, you can now Publish this InfoPath form to the SharePoint Site.
Hope you like this post. Have a nice day. Will come up with another post sooner.
If interested, you can have a look at Visual Studio Workflows which was explained clearly by Zaltan's blog at http://dotnet.org.za/zlatan/archive/2007/09/15/how-to-create-a-sharepoint-2007-workflow-using-visual-studio-2008-beta-example.aspx
Requirements: http://walaapoints.blogspot.com/2007/02/custom-workflow-with-visual-studio-2005.html
In this post, I am going to detail about how to submit the data from an InfoPath form to a SharePoint List.
In order to detail this, I am taking an example of a feedback form, where in the end users will fill the form and submit, and upon submitting the form, the details entered in the form will be submitted to a SharePoint List.
Step 1: First of Create a Custom List in a SharePoint Site. I have named it as Feedback. Now create some columns as per your feedback form. I have created Username, Subject, Description, and EmailID as columns in which all the columns are of type Single text.
Step 2: Now open InfoPath Form 2007, and follow the below steps which has to be done in InfoPath Form.
- In Getting Started Wizard, Select Design a Form Template.

- In Design a Form Template, make sure that, Form Template -> Blank -> and finally Check box saying that "Enable Browser-Compatible features only" are Selected.

- Now when the Form Opens, see the Design Tasks Pane, if you don't see this pane, you can select it from Menu options from View and select Task Pane or press F1. Most of the tasks that we perform in designing the InfoPath form are from here in the Design Task Pane.

- Click on Layout in Design Task Pane and then click on Custom Table... link.

And a window pops up requesting for number of Columns and Rows. Enter 3 and 6 respectively.
- And the table appears in the design window in which you have to add Text boxes and Rich Text box from the Design Task Pane in Controls, so that the form as a whole should appear as follows.

- Now Click on Data Sources in Design Task Pane. Name the Data Sources as shown below. The names should be appropriate to the labels mentioned such as Username holds datasource nameDS, Subject -> subjectDS, Description -> descriptionDS, Email ID -> emailDS respectively.
- You will now see one more datasource that is been added in the Data Source which is listID. To get this, right click on myFields and select Add.

There you do the following. You will be seeing a number in the default value ie., "9FE04D9C-1C6E-4A96-8FA1-785C878DD0F5".
This is the SharePoint list ID, which you will be getting it from SharePoint Site. In order to get this ID, Click on Site Actions -> Site Settings -> Modify All Settings, and then select "site libraries and lists" in the 'Site Administration' category.
Then select your list name and if you look into the URL, you can find the list ID. ie., http://mossdev2:3672/_layouts/ListEdit.aspx?List={9FE04D9C-1C6E-4A96-8FA1-785C878DD0F5}&Source=http%3A%2F%2Fmossdev2%3A3672%2F%5Flayouts%2Fmcontent%2Easpx. This bold value is the listID in the URL. Copy that value and paste it in the default value. - Now change the Button name, ie double click on the button place in the table. Change the name of the button to Submit, as shown below.
- Now we should create Data Connections. For this example, we need two dataconnections, one is to submit the data to SharePoint list and the other is an XML data connection which is used to match the InfoPath form Data Sources to SharePoint List Columns.


- Open a Notepad and write the following code in it.
- Code:
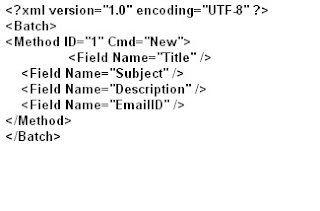
- Now save this file with extension as .xml. I have saved the file name with feedback.xml
- Now go back to InfoPath, and in the menu, Click on Tools -> DataConnections and then Click Add in the Data Connection Wizard. Select 'Create a new connection to:' and then select Recieve data and Click Next. Select XML document and then click Next, and finally browse the file feedback.xml which you have created in Step 2 and click Next. Select the option 'Include the data as a resource file in the form template or template part' and click Next. Give a name to this Data Connection, I have given the name as feedback.
We are now done, Creating one Data Connection.

DataConnection for Submitting the Data: In the men, Click on Tools -> DataConnections and then Click Add in the Data Connection Wizard.
- Select the option Create a new Connection to: and click Next, Select To a Web service to submit your data. And in the "Enter the location of the Web service you want users to submit their forms to: " add the URL of your SharePoint Site, ie., http://<mossdev2:3672>
- You will now be showing a list of web services, as our goal is to submit the data, we are going to select the option UpdateListItems option and then click Next. You will be seeing the Parameters list in which you will be having tns:listName and tns:udpates. Double click on tns:listName and here you have to specify the listname which InfoPath form is referering . Initially we have created a Datasource by name listID in which we have refered to SharePoint list by its listID and hence we are going to give that datasource here and hence select the DataSource listID and click OK. Now Double Click on tns:updates, and in the Data Source window, select the previously created Data Connection that is feedback and then select Batch and click OK.
- Next in the Parameter Options, Select the Field or Group that refers to listID and in the Include:, you have to select XML subtree, including selected item and click Next.
Now it is the time for us to talk about the Submit Button in the form. If you double click the form, it will open up the properties window, in which you have to click on edit form code.

This will redirect to VSTA editor. if it is showing an error such as the following:

It means that you haven't installed the VSTA. You have to install VSTA in order to perform coding in InfoPath forms. For directions to installing VSTA, Click here...
Once it is redirected to VSTA editor, the code inside will look like the following..
Write the following code in Button Click Event "CTRL1_5_Clicked"
try
{
XPathNavigator root = MainDataSource.CreateNavigator();
// Retrieve the values for the separation list item
string listID = root.SelectSingleNode("/my:myFields/my:listID", NamespaceManager).Value;
string nameDS = root.SelectSingleNode("/my:myFields/my:nameDS", NamespaceManager).Value;
string subjectDS = root.SelectSingleNode("/my:myFields/my:subjectDS", NamespaceManager).Value;
string descriptionDS = root.SelectSingleNode("/my:myFields/my:descriptionDS", NamespaceManager).Value;
string emailDS = root.SelectSingleNode("/my:myFields/my:emailDS", NamespaceManager).Value;
if (listID == null || listID == "" || nameDS == "" || subjectDS == "" || descriptionDS == null || emailDS == null)
{ }
else
{
//This is CAML xml file. it contains batch and method nodes
XPathNavigator batch = DataSources["feedback"].CreateNavigator();
batch.SelectSingleNode("/Batch/Method/Field[@Name='Title']", NamespaceManager).SetValue(nameDS);
batch.SelectSingleNode("/Batch/Method/Field[@Name='Subject']", NamespaceManager).SetValue(subjectDS);
batch.SelectSingleNode("/Batch/Method/Field[@Name='Description']", NamespaceManager).SetValue(descriptionDS);
batch.SelectSingleNode("/Batch/Method/Field[@Name='EmailID']", NamespaceManager).SetValue(emailDS);
DataConnections["Web Service Submit"].Execute();
}
}
catch (Exception ex)
{
ex.Message.ToString();
}
Now that you are done with coding. You now need to preview the form, by clicking preview, and you will see the form, fill the details and click on submit. The details will be submitted in the SharePoint list.
Once this testing is done, you can now Publish this InfoPath form to the SharePoint Site.
Hope you like this post. Have a nice day. Will come up with another post sooner.
If interested, you can have a look at Visual Studio Workflows which was explained clearly by Zaltan's blog at http://dotnet.org.za/zlatan/archive/2007/09/15/how-to-create-a-sharepoint-2007-workflow-using-visual-studio-2008-beta-example.aspx
Requirements: http://walaapoints.blogspot.com/2007/02/custom-workflow-with-visual-studio-2005.html
Can't get it to submit, whenever I click on the submit button nothing happens.
ReplyDeleteHi Latte,
ReplyDeleteHave you gone step by step. The above example holds good only when all the controls mentioned in this blog refer the same name as mentioned.
Can you please make sure that you have used the control IDs and respective names the same as mentioned..
Hi, thanks for your reply. Unfortunately though when I click on the submit button nothing happens.
ReplyDeletePlease the code sample below. Columns in my list are Title, FirstName, LastName, Email, Phone.
Am I missing a step? Thanks.
((ButtonEvent)EventManager.ControlEvents["btnSubmit"]).Clicked += new ClickedEventHandler(btnSubmit_Clicked);
EventManager.FormEvents.Submit += new SubmitEventHandler(FormEvents_Submit);
}
public void btnSubmit_Clicked(object sender, ClickedEventArgs e)
{
try
{
XPathNavigator root = MainDataSource.CreateNavigator();
// Retrieve the values for the separation list item
string listID = root.SelectSingleNode("/my:myFields/my:listID", NamespaceManager).Value;
string titleDS = root.SelectSingleNode("/my:myFields/my:Title", NamespaceManager).Value;
string fnameDS = root.SelectSingleNode("/my:myFields/my:FirstName", NamespaceManager).Value;
string lnameDS = root.SelectSingleNode("/my:myFields/my:LastName", NamespaceManager).Value;
string phoneDS = root.SelectSingleNode("/my:myFields/my:Phone", NamespaceManager).Value;
string EmailDS = root.SelectSingleNode("/my:myFields/my:Email", NamespaceManager).Value;
if (listID == null)
{
}
else
{
//This is CAML xml file. it contains batch and method nodes
XPathNavigator batch = DataSources["submit"].CreateNavigator();
batch.SelectSingleNode("/Batch/Method/Field[@Name='Title']", NamespaceManager).SetValue(titleDS);
batch.SelectSingleNode("/Batch/Method/Field[@Name='FirstName']", NamespaceManager).SetValue(fnameDS);
batch.SelectSingleNode("/Batch/Method/Field[@Name='LastName']", NamespaceManager).SetValue(lnameDS);
batch.SelectSingleNode("/Batch/Method/Field[@Name='Phone']", NamespaceManager).SetValue(phoneDS);
batch.SelectSingleNode("/Batch/Method/Field[@Name='Email']", NamespaceManager).SetValue(EmailDS);
DataConnections["Submit to MyContacts"].Execute();
}
}
catch (Exception ex)
{
ex.Message.ToString();
}
}
public void FormEvents_Submit(object sender, SubmitEventArgs e)
{
// If the submit operation is successful, set
// e.CancelableArgs.Cancel = false;
// Write your code here.
}
}
}
May 19, 2011 5:42 PM
Word verification
Visual verification
Listen and type the numbers you hear
I am confused as to what my webservice address is
ReplyDeletehttp:///_vti_bin/lists.asmx?WSDL
I click submit and then check the list and there is nothing there
Ooops.... Sorry it was my bad. It should be followed by your SharePoint SiteCollection URL. ie., it should be http://mossdev2:3672/_vti_bin/lists.asmx?WSDL
DeleteHi I have followd the complete steps..i am not able to insert the values to sharepoint list. No error even then not able to submit..plz give me the reply ASAP.
ReplyDeleteMake sure that the data was connected correctly and also the XpathNavigators used were properly mentioned without any errors.
ReplyDeleteI have also tried what this article describes and nothing happens. No form submit, no error, nothing. Very frustrating.
ReplyDeleteHowever, when I run the debugger in Microsoft Visual Studio Tools for Applications, I get the following message when I click the Submit button "A first chance exception of type 'System.Net.WebException' occurred in Microsoft.Office.InfoPath.Client.Internal.Host.dll"
Any ideas on what is going on?
oXml.SelectSingleNode("/Batch/Method/Field/[@Name='Date']", NamespaceManager).SetValue(strDate)
ReplyDeletethe above line of code thrown an error : "Expression must evaluate to a node-set"
Please Leave Your Comments Here On This Post.....
ReplyDelete